Sunday, August 30, 2020

Oracle RAC node unavailable with error: Server unexpectedly closed network connection6]clsc_connect: (0x251c670) no listener at (ADDRESS=(PROTOCOL=ipc)(KEY=OCSSD_LL_node2_))

 Early midnight I received a call from the monitoring team that one of the critical production database node is not available.

As I am aware that this DC has power issues most of the time, I expected this will be ok when all gets up after power is on. But still, the problem continued with frequent node evictions. 

The Oracle Cluster is up in only one node and the other node yet facing the issue. 

In my initial validation, I make sure all the shared storage is up, time is in sync, then further Using below output quickly found that the issue is with Cluster interconnect communication issue.

oracle@node1 ~]$ ps -ef| egrep 'crsd.bin|ocssd.bin|evmd.bin' | grep -v grep
oracle   11815 11809  0 12:20 ?        00:00:00 /u01/app/crs/bin/evmd.bin
root     11929 10953  3 12:20 ?        00:01:07 /u01/app/crs/bin/crsd.bin reboot
oracle   12641 12148  0 12:20 ?        00:00:06 /u01/app/crs/bin/ocssd.bin

[oracle@node2 ~]$ ps -ef| egrep 'crsd.bin|ocssd.bin|evmd.bin' | grep -v grep
oracle   11508 11506  0 12:31 ?        00:00:00 /u01/app/crs/bin/evmd.bin
root     11661 10700  3 12:31 ?        00:00:47 /u01/app/crs/bin/crsd.bin reboot 

To make my anticipation true the below alert was also pointing to same issue which is indirectly related to the Interconnectivity issue.

vi /u01/app/crs/log/node2/crsd/crsd.log

Server unexpectedly closed network connection6]clsc_connect: (0x251c670) no listener at (ADDRESS=(PROTOCOL=ipc)(KEY=OCSSD_LL_node2_))

2020-08-30 09:52:42.975: [ CSSCLNT][2274735840]clsssInitNative: connect failed, rc 9

2020-08-30 09:52:42.975: [  CRSRTI][2274735840]0CSS is not ready. Received status 3 from CSS. Waiting for good status ..

[oracle@node1 ~]$ ping node2-priv
PING node2-priv..cstt.gov (172.16.0.2) 56(84) bytes of data.
From node1-priv..cstt.gov (172.16.0.1) icmp_seq=2 Destination Host Unreachable
From node1-priv..cstt.gov (172.16.0.1) icmp_seq=3 Destination Host Unreachable
From node1-priv..cstt.gov (172.16.0.1) icmp_seq=4 Destination Host Unreachable

Solution:
The break between cluster interconnectivity is the culprit here. Solving the private network issue would resolve the problem. 

In our case, the Private ethernet cards are up and active on both nodes but unable to communicate via private IPs. 
Seems strange for us but when the physical inspection was done in DC it was found the problem in Network cable and a physical port. 
As soon as the physical issue is resolved we have rebooted the server which came up successfully. Hence the problem is resolved.

Sunday, February 24, 2019

Oracle Virtual Private Database (VPD) - 1

The Virtual Private Database (VPD) is a concept from Fine Grain Auditing feature of Oracle. Implementing this feature enables security policies to control database access at the row or column or combination of both levels. Since this works inside the database there is no way to bypass the security irrespective of front end application/utility.

This article is a brief introduction and explains the fundamental VPD mechanism. The upcoming continuation of this series will explore more details about VPD feature.

How it works: 


When a user accesses a table, view, or synonym that is being protected by VPD policy, Oracle Database dynamically modifies the statement intruding from that users session. If the user is eligible to view/modify the data then he will be allowed to do so, if not then the data will be hidden.

We can implement VPD Policies to any of SELECT, INSERT, UPDATE, INDEX, and DELETE as per security compliances. However, In this brief article about VPD, I am explaining how to implement VPD against SELECT statements on a table called FIN.

Notes:

If you are planned for the actual implementation of this feature, you should be having finalized set of Objects eligible as per application owners.  Also, make sure no direct implementation on Production without proper UAT validation. Misconfiguration of this feature may impact business continuity. 


VPD Implementation.


Two steps involved in implementing this feature, first a suitable VPD function should be created where you will be mentioning which database user should be allowed to see the sensitive data. Second, a VPD Policy on the eligible table.


Create a VPD Function


Create the below function as sysdba (which is having the exempt policy by default), this function will validate the user, if the user is FIN then it will except the SELECT privilege on the sensitive columns mentioned the upcoming VPD policies, if any user other than these can’t see the sensitive data mentioned in VPD policies.

create or replace FUNCTION  "FIN_FUN_VPD" (p_schema in varchar2,p_object_name in varchar2)
  return varchar2
  as
  v_ouser  VARCHAR2(30);
  begin
  v_ouser := SYS_CONTEXT('USERENV','SESSION_USER');
  -- dbms_output.put_line('p_schema = ' || p_schema );
     if ( v_ouser = 'FIN' ) then
             return '1=1';
     else
             return '1=0';
     end if;
  end;

Create a VPD Policy:


begin
dbms_rls.add_policy(
object_schema =>'FIN',
object_name =>'FIN_BNK_ACCNTS',
policy_name => 'VPD_FIN_BNK_ACCNTS',
policy_function =>'FIN_FUN_VPD',
statement_types =>'SELECT',
sec_relevant_cols => 'BANK_ACCOUNT_NUM',
sec_relevant_cols_opt => dbms_rls.all_rows
);
end;
/

Once the above FUNCTION & POLICY is enabled then make sure the output of your statements is as expected. 
From the above example, the users other than FIN should not see the column called BANK_ACCOUNT_NUM in FIN_BNK_ACCNTS table.

View the list of VPD Policies and Function against proposed tables:


COL OBJECT_OWNER FORMAT A10
COL OBJECT_NAME FORMAT A20
COL POLICY_NAME FORMAT A25
COL FUNCTION FORMAT A25
SET LINESIZE 250
SELECT OBJECT_OWNER,OBJECT_NAME,POLICY_NAME,FUNCTION,SEL,INS,UPD,DEL,IDX,ENABLE FROM DBA_POLICIES WHERE POLICY_NAME LIKE '%VPD%';

OBJECT_OWN OBJECT_NAME          POLICY_NAME               FUNCTION                  SEL INS UPD DEL IDX ENA                                                                                                                                               
---------- -------------------- ------------------------- ------------------------- --- --- --- --- --- ---                                                                                                                                               
FIN         FIN_BNK_ACCNTS         VPD_FIN_BNK_ACCNTS_1        FIN_FUN_VPD             YES NO  NO  NO  NO  YES                                                                                                                                               

View the list of VPD enabled columns:


COL OBJECT_OWNER FORMAT A10
COL OBJECT_NAME FORMAT A30
COL POLICY_GROUP FORMAT A30
COL POLICY_NAME FORMAT A30
COL SEC_REL_COLUMN FORMAT A30
SELECT * FROM DBA_SEC_RELEVANT_COLS;

OBJECT_OWN OBJECT_NAME                    POLICY_GROUP                   POLICY_NAME                    SEC_REL_COLUMN                 COLUMN_O
---------- ------------------------------ ------------------------------ ------------------------------ ------------------------------ --------
FIN         FIN_BNK_ACCNTS          SYS_DEFAULT                    FIN_FUN_VPD    BANK_ACCOUNT_NUM                   ALL_ROWS


Roll back Plan:


In case if there is a mandate to roll back the VPD functionality that got implemented same as above then the below policies can be dropped or If we need to just disable the VPD functionality on a particular table on a temporary basis then it is enough to ‘disable’ the related policy instead of dropping it.

--Drop VPD POLICIES:-


begin
dbms_rls.drop_policy(
'FIN','FIN_BNK_ACCNTS','VPD_FIN_BNK_ACCNTS');
end;
/

--Drop the VPD functions.

Drop function  FIN_FUN_VPD;


--Make sure the VPD got decommissioned completely.

COL OBJECT_OWNER FORMAT A10
COL OBJECT_NAME FORMAT A20
COL POLICY_NAME FORMAT A25
COL FUNCTION FORMAT A25
SET LINESIZE 250
SELECT OBJECT_OWNER,OBJECT_NAME,POLICY_NAME,FUNCTION,SEL,INS,UPD,DEL,IDX,ENABLE FROM DBA_POLICIES WHERE POLICY_NAME LIKE '%VPD%';


Saturday, February 23, 2019

Steps to Install and Configure Oracle 19c 2 Nodes RAC Setup on Oracle Linux 7.6 (64-Bit)

If you are curious to know how to install and configure Oracle 19c Cluster setup to explore the new features of this version then this article may guide you through.


Software Requirements.


1. Download Latest Oracle VM Virtual box for your suitable host OS from https://www.virtualbox.org/wiki/Downloads


2. Download Oracle Linux 6.7 (64-bit) from Oracle edelivery site. https://www.edelivery.oracle.com


3. Download Oracle 19c GRID and RDBMS software from oracle edelivery.


System Readiness:


#################################################
 It is assumed that the required 2 Database Servers are installed 
and configured over Oracle VM Virtualbox environment using the above software. Including Network and Shared Storage Provisioning.
#################################################

Now we will see how we can configure the Oracle 19c two nodes RAC setup. 


Execute the below commands to quickly set up the system prerequisites on both servers.


sed -i 's/SELINUX=enforcing/SELINUX=disabled/g' /etc/selinux/config
systemctl stop firewalld
systemctl disable firewalld
systemctl stop chronyd.service
systemctl disable chronyd.service
mv /etc/chrony.conf /etc/chrony.conf.bak

groupadd -g 54331 oinstall
groupadd -g 54332 dba
groupadd -g 54333 oper
groupadd -g 54334 backupdba
groupadd -g 54335 dgdba
groupadd -g 54336 kmdba
groupadd -g 54337 asmdba
groupadd -g 54338 asmoper
groupadd -g 54339 asmadmin
groupadd -g 54340 racdba

useradd -m -u 54332 -g oinstall -G dba,asmadmin,asmdba,asmoper -d /home/grid -s /bin/bash  grid 
echo "grid" | passwd --stdin grid
useradd -m -u 54331 -g oinstall -G dba,oper,backupdba,dgdba,kmdba,asmdba,asmadmin,racdba -d /home/oracle -s /bin/bash  oracle 
echo "oracle" | passwd --stdin oracle
mkdir -p /u01/app/grid
mkdir -p /u01/app/19.2/grid
mkdir -p /u02/app/oracle
mkdir -p /u02/app/oracle/product/19.2
chmod -R 775 /u01
chmod -R 775 /u02
chown -R grid:oinstall /u01
chown -R oracle:oinstall /u02/app/oracle


Update the bash profile file for grid, oracle and root users respectively as below.


In grid's bash profile:

export ORACLE_SID=+ASM1
export ORACLE_BASE=/u01/app/grid
export ORACLE_HOME=/u01/app/19.2/grid
export PATH=$ORACLE_HOME/bin:$ORACLE_HOME/OPatch:$PATH
umask 22 

In oracle's bash profile:

export ORACLE_SID=orcl
export ORACLE_BASE=/u02/app/oracle
export ORACLE_HOME=$ORACLE_BASE/product/19.2
export PATH=$ORACLE_HOME/bin:$ORACLE_HOME/OPatch:$PATH
umask 22 

In root's bash profile:

export ORACLE_HOME=/u01/app/19.2/grid
export PATH=$ORACLE_HOME/bin:$ORACLE_HOME/OPatch:$PATH

Install the required RPMs as below:


yum install -y oracle-database-preinstall-18c.x86_64

yum install kmod-oracleasm

yum install oracleasm-support oracleasmlib oracleasm-`uname -r`


Configure oracleasm utility.


oracleasm configure -i 


Update the '/etc/hosts' file with suitable IP Addresses and Hostnames.

#public ip
192.168.56.115  sspdb01.localdomain sspdb01 
192.168.56.116  sspdb02.localdomain sspdb02

#Vip
192.168.56.118 sspdb01-vip.localdomain sspdb01-vip
192.168.56.119 sspdb02-vip.localdomain  sspdb02-vip

#private ip
10.10.10.21   sspdb01-priv.localdomain sspdb01-priv
10.10.10.22   sspdb02-priv.localdomain sspdb02-priv

#SCAN ip
192.168.56.120 sspdb-cluster sspdb-cluster-scan


Make sure the public and Private networks are reachable from both nodes. 
The VIP network should not be reachable as of now. once the setup is done this virtual network will be enabled automatically.
Make sure the 3 Scan IPs are resolvable via nslookup utility; since its just a lab setup I used a single scan IP as mentioned in above '/etc/hosts' file.


Cluster (Grid) Software Setup:


In 19c, the Grid Clusterware setup is slightly differed with previous traditional installations. Here we have to Unzip the grid software to Grid's ORACLE_HOME directly and run the gridSetup.sh script.


as root:
cd /media/sf_Software/19c/
unzip -q V981627-01.zip -d /u01/app/19.2/grid
chown -R grid:oinstall /u01


As grid user:
cd /u01/app/19.2/grid/
./gridSetup.sh


Unlike the previous versions, you can see various types cluster setups available in 19c.  
To know more about each type cluster configuration and it's purpose,  please refer to Oracle Document grid-infrastructure-installation-and-upgrade 19c.

However, here is the generic installation so I will be choosing the default  standalone cluster.


We can see a new SCAN option called Shared, for more information refer to grid-infrastructure-installation-and-upgrade 19c.

Selecting the default Local SCAN option here.


Add the 2nd node's details and setup SSH connectivity for Grid user.


self-explanatory


self-explanatory


self-explanatory


self-explanatory


Choose suitable interfaces as below.


As usual choose ASM Storage.


I chose the Grid Infrastructure Management Repository (GIMR) to be configured as this will be useful for debugging cluster related failures.


I will be using same Disk group for OCR/VD/GIMR here, though we have the option to different disk group for GIMR.


Below are the required OCR disk group capacity depending on the Redundancy which will also holds GIMR data.

External: around 30 GB
Normal: around 60 GB
High : around 90 GB.


I selected External Redundancy


self-explanatory


self-explanatory


self-explanatory


self-explanatory


self-explanatory


self-explanatory


We have the option to provide the root or equivalent sudo credentials in the below step. However I would like to see what exactly it does during the root scripts execution, the credentials are not passed.


self-explanatory


Run the 'Fix and Check Again' and also resolve the relevant warnings/Failed checks.


self-explanatory


self-explanatory


Once make sure we are good to proceed.


self-explanatory


self-explanatory


You can observe the changes in root.sh output as compared to previous installations. 

1st Node:


[root@sspdb01 rpm]# /u01/app/oraInventory/orainstRoot.sh
Changing permissions of /u01/app/oraInventory.
Adding read,write permissions for group.
Removing read,write,execute permissions for world.

Changing groupname of /u01/app/oraInventory to oinstall.
The execution of the script is complete.
[root@sspdb01 rpm]# /u01/app/19.2/grid/root.sh
Performing root user operation.

The following environment variables are set as:
    ORACLE_OWNER= grid
    ORACLE_HOME=  /u01/app/19.2/grid

Enter the full pathname of the local bin directory: [/usr/local/bin]: 
   Copying dbhome to /usr/local/bin ...
   Copying oraenv to /usr/local/bin ...
   Copying coraenv to /usr/local/bin ...


Creating /etc/oratab file...
Entries will be added to the /etc/oratab file as needed by
Database Configuration Assistant when a database is created
Finished running generic part of root script.
Now product-specific root actions will be performed.
Relinking oracle with rac_on option
Using configuration parameter file: /u01/app/19.2/grid/crs/install/crsconfig_params
The log of current session can be found at:
  /u01/app/grid/crsdata/sspdb01/crsconfig/rootcrs_sspdb01_2019-02-23_00-25-26AM.log
2019/02/23 00:26:07 CLSRSC-594: Executing installation step 1 of 19: 'SetupTFA'.
2019/02/23 00:26:08 CLSRSC-594: Executing installation step 2 of 19: 'ValidateEnv'.
2019/02/23 00:26:08 CLSRSC-363: User ignored prerequisites during installation
2019/02/23 00:26:08 CLSRSC-594: Executing installation step 3 of 19: 'CheckFirstNode'.
2019/02/23 00:26:17 CLSRSC-594: Executing installation step 4 of 19: 'GenSiteGUIDs'.
2019/02/23 00:26:20 CLSRSC-594: Executing installation step 5 of 19: 'SetupOSD'.
2019/02/23 00:26:20 CLSRSC-594: Executing installation step 6 of 19: 'CheckCRSConfig'.
2019/02/23 00:26:23 CLSRSC-594: Executing installation step 7 of 19: 'SetupLocalGPNP'.
2019/02/23 00:29:25 CLSRSC-594: Executing installation step 8 of 19: 'CreateRootCert'.
2019/02/23 00:30:00 CLSRSC-4002: Successfully installed Oracle Trace File Analyzer (TFA) Collector.
2019/02/23 00:30:01 CLSRSC-594: Executing installation step 9 of 19: 'ConfigOLR'.
2019/02/23 00:30:39 CLSRSC-594: Executing installation step 10 of 19: 'ConfigCHMOS'.
2019/02/23 00:30:40 CLSRSC-594: Executing installation step 11 of 19: 'CreateOHASD'.
2019/02/23 00:31:06 CLSRSC-594: Executing installation step 12 of 19: 'ConfigOHASD'.
2019/02/23 00:31:07 CLSRSC-330: Adding Clusterware entries to file 'oracle-ohasd.service'
2019/02/23 00:32:06 CLSRSC-594: Executing installation step 13 of 19: 'InstallAFD'.
2019/02/23 00:32:32 CLSRSC-594: Executing installation step 14 of 19: 'InstallACFS'.
2019/02/23 00:32:53 CLSRSC-594: Executing installation step 15 of 19: 'InstallKA'.
2019/02/23 00:33:11 CLSRSC-594: Executing installation step 16 of 19: 'InitConfig'.

ASM has been created and started successfully.

[DBT-30001] Disk groups created successfully. Check /u01/app/grid/cfgtoollogs/asmca/asmca-190223AM123423.log for details.

2019/02/23 00:36:42 CLSRSC-482: Running command: '/u01/app/19.2/grid/bin/ocrconfig -upgrade grid oinstall'
CRS-4256: Updating the profile
Successful addition of voting disk bec6dfe80d344f21bf747466dd2342aa.
Successfully replaced voting disk group with +OCR.
CRS-4256: Updating the profile
CRS-4266: Voting file(s) successfully replaced
##  STATE    File Universal Id                File Name Disk group
--  -----    -----------------                --------- ---------
 1. ONLINE   bec6dfe80d344f21bf747466dd2342aa (/dev/oracleasm/disks/OCR05) [OCR]
Located 1 voting disk(s).
2019/02/23 00:42:07 CLSRSC-594: Executing installation step 17 of 19: 'StartCluster'.
2019/02/23 00:44:59 CLSRSC-343: Successfully started Oracle Clusterware stack
2019/02/23 00:44:59 CLSRSC-594: Executing installation step 18 of 19: 'ConfigNode'.
2019/02/23 00:53:03 CLSRSC-594: Executing installation step 19 of 19: 'PostConfig'.
2019/02/23 01:00:02 CLSRSC-325: Configure Oracle Grid Infrastructure for a Cluster ... succeeded

2nd Node:


[root@sspdb02 ~]# /u01/app/19.2/grid/root.sh
Performing root user operation.

The following environment variables are set as:
    ORACLE_OWNER= grid
    ORACLE_HOME=  /u01/app/19.2/grid

Enter the full pathname of the local bin directory: [/usr/local/bin]: 
   Copying dbhome to /usr/local/bin ...
   Copying oraenv to /usr/local/bin ...
   Copying coraenv to /usr/local/bin ...


Creating /etc/oratab file...
Entries will be added to the /etc/oratab file as needed by
Database Configuration Assistant when a database is created
Finished running generic part of root script.
Now product-specific root actions will be performed.
Relinking oracle with rac_on option
Using configuration parameter file: /u01/app/19.2/grid/crs/install/crsconfig_params
The log of current session can be found at:
  /u01/app/grid/crsdata/sspdb02/crsconfig/rootcrs_sspdb02_2019-02-23_01-04-55AM.log
2019/02/23 01:05:38 CLSRSC-594: Executing installation step 1 of 19: 'SetupTFA'.
2019/02/23 01:05:39 CLSRSC-594: Executing installation step 2 of 19: 'ValidateEnv'.
2019/02/23 01:05:39 CLSRSC-363: User ignored prerequisites during installation
2019/02/23 01:05:39 CLSRSC-594: Executing installation step 3 of 19: 'CheckFirstNode'.
2019/02/23 01:05:45 CLSRSC-594: Executing installation step 4 of 19: 'GenSiteGUIDs'.
2019/02/23 01:05:45 CLSRSC-594: Executing installation step 5 of 19: 'SetupOSD'.
2019/02/23 01:05:45 CLSRSC-594: Executing installation step 6 of 19: 'CheckCRSConfig'.
2019/02/23 01:05:50 CLSRSC-594: Executing installation step 7 of 19: 'SetupLocalGPNP'.
2019/02/23 01:05:55 CLSRSC-594: Executing installation step 8 of 19: 'CreateRootCert'.
2019/02/23 01:05:55 CLSRSC-594: Executing installation step 9 of 19: 'ConfigOLR'.
2019/02/23 01:06:10 CLSRSC-594: Executing installation step 10 of 19: 'ConfigCHMOS'.
2019/02/23 01:06:11 CLSRSC-594: Executing installation step 11 of 19: 'CreateOHASD'.
2019/02/23 01:06:17 CLSRSC-594: Executing installation step 12 of 19: 'ConfigOHASD'.
2019/02/23 01:06:18 CLSRSC-330: Adding Clusterware entries to file 'oracle-ohasd.service'
2019/02/23 01:07:47 CLSRSC-594: Executing installation step 13 of 19: 'InstallAFD'.
2019/02/23 01:08:12 CLSRSC-594: Executing installation step 14 of 19: 'InstallACFS'.
2019/02/23 01:08:40 CLSRSC-594: Executing installation step 15 of 19: 'InstallKA'.
2019/02/23 01:08:58 CLSRSC-594: Executing installation step 16 of 19: 'InitConfig'.
2019/02/23 01:09:13 CLSRSC-4002: Successfully installed Oracle Trace File Analyzer (TFA) Collector.
2019/02/23 01:09:53 CLSRSC-594: Executing installation step 17 of 19: 'StartCluster'.
2019/02/23 01:11:46 CLSRSC-343: Successfully started Oracle Clusterware stack
2019/02/23 01:11:47 CLSRSC-594: Executing installation step 18 of 19: 'ConfigNode'.
2019/02/23 01:14:42 CLSRSC-594: Executing installation step 19 of 19: 'PostConfig'.
2019/02/23 01:15:35 CLSRSC-325: Configure Oracle Grid Infrastructure for a Cluster ... succeeded

Post of Cluster Setup:


[root@sspdb02 bin]# ./crsctl check cluster -all
**************************************************************
sspdb01:
CRS-4537: Cluster Ready Services is online
CRS-4529: Cluster Synchronization Services is online
CRS-4533: Event Manager is online
**************************************************************
sspdb02:
CRS-4537: Cluster Ready Services is online
CRS-4529: Cluster Synchronization Services is online
CRS-4533: Event Manager is online
**************************************************************

[root@sspdb02 bin]# ./crsctl stat res -t
--------------------------------------------------------------------------------
Name           Target  State        Server                   State details       
--------------------------------------------------------------------------------
Local Resources
--------------------------------------------------------------------------------
ora.LISTENER.lsnr
               ONLINE  ONLINE       sspdb01                  STABLE
               ONLINE  ONLINE       sspdb02                  STABLE
ora.chad
               ONLINE  ONLINE       sspdb01                  STABLE
               ONLINE  ONLINE       sspdb02                  STABLE
ora.net1.network
               ONLINE  ONLINE       sspdb01                  STABLE
               ONLINE  ONLINE       sspdb02                  STABLE
ora.ons
               ONLINE  ONLINE       sspdb01                  STABLE
               ONLINE  ONLINE       sspdb02                  STABLE
--------------------------------------------------------------------------------
Cluster Resources
--------------------------------------------------------------------------------
ora.ASMNET1LSNR_ASM.lsnr(ora.asmgroup)
      1        ONLINE  ONLINE       sspdb01                  STABLE
      2        ONLINE  ONLINE       sspdb02                  STABLE
      3        ONLINE  OFFLINE                               STABLE
ora.LISTENER_SCAN1.lsnr
      1        ONLINE  ONLINE       sspdb02                  STABLE
ora.MGMTLSNR
      1        OFFLINE OFFLINE                               STABLE
ora.OCR.dg(ora.asmgroup)
      1        ONLINE  ONLINE       sspdb01                  STABLE
      2        ONLINE  ONLINE       sspdb02                  STABLE
      3        OFFLINE OFFLINE                               STABLE
ora.asm(ora.asmgroup)
      1        ONLINE  ONLINE       sspdb01                  Started,STABLE
      2        ONLINE  ONLINE       sspdb02                  Started,STABLE
      3        OFFLINE OFFLINE                               STABLE
ora.asmnet1.asmnetwork(ora.asmgroup)
      1        ONLINE  ONLINE       sspdb01                  STABLE
      2        ONLINE  ONLINE       sspdb02                  STABLE
      3        OFFLINE OFFLINE                               STABLE
ora.cvu
      1        ONLINE  ONLINE       sspdb02                  STABLE
ora.mgmtdb
      1        OFFLINE OFFLINE                               STABLE
ora.qosmserver
      1        ONLINE  ONLINE       sspdb02                  STABLE
ora.scan1.vip
      1        ONLINE  ONLINE       sspdb02                  STABLE
ora.sspdb01.vip
      1        ONLINE  ONLINE       sspdb01                  STABLE
ora.sspdb02.vip
      1        ONLINE  ONLINE       sspdb02                  STABLE
--------------------------------------------------------------------------------

The above mentioned OFFLINE services are needed to be exclusively added to make it ONLINE, Refer to grid-infrastructure-installation-and-upgrade 19c.

At this point, the GRID Setup is successfully completed. 

Oracle Software installation:


Unzip the Oracle database software to oracle's ORACLE_HOME directly and run the runInstaller.sh script.

as root:
cd /media/sf_Software/19c/
unzip -q V981623-01.zip -d /u02/app/oracle/product/19.2
chown -R oracle:oinstall /u02

As oracle user:
cd /u02/app/oracle/product/19.2

start the installation now.

./runInstaller.sh


self-explanatory


Make sure all the Clusterware Nodes are selected and also setup the SSH connectivity for 'oracle' user as below.


self-explanatory


self-explanatory


self-explanatory


Choose the relevant groups, I have selected the default ones.


I will run the root scripts exclusively hence leaving the below one unchecked.


self-explanatory


self-explanatory


self-explanatory


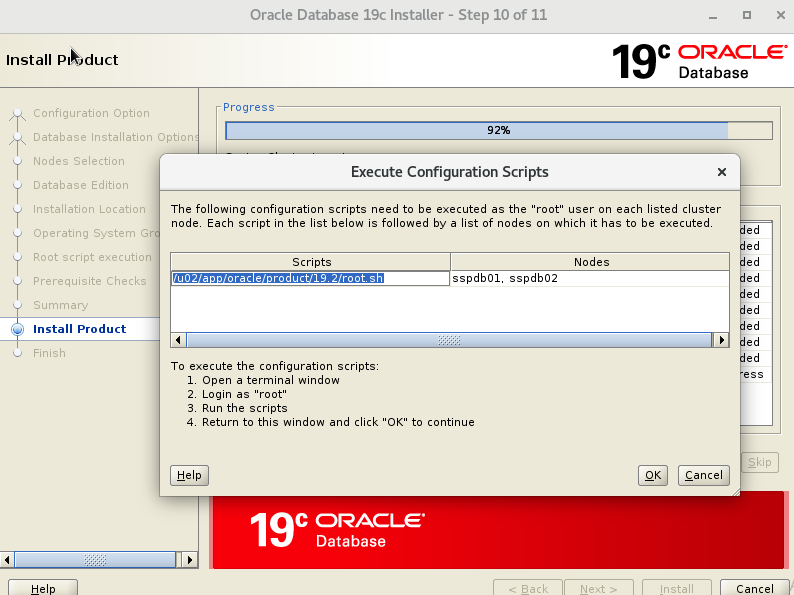
Run the root.sh script on both nodes.


self-explanatory


The database software installation is successfully completed.

I hope you enjoyed reading this article. 

Please let me know once you also install this setup. 

Oracle RAC node unavailable with error: Server unexpectedly closed network connection6]clsc_connect: (0x251c670) no listener at (ADDRESS=(PROTOCOL=ipc)(KEY=OCSSD_LL_node2_))

 Early midnight I received a call from the monitoring team that one of the critical production database node is not available. As I am aware...