If you are curious to know how to install and configure Oracle 19c Cluster setup to explore the new features of this version then this article may guide you through.
1. Download Latest Oracle VM Virtual box for your suitable host OS from https://www.virtualbox.org/wiki/Downloads

2. Download Oracle Linux 6.7 (64-bit) from Oracle edelivery site. https://www.edelivery.oracle.com

3. Download Oracle 19c GRID and RDBMS software from oracle edelivery.

#################################################
It is assumed that the required 2 Database Servers are installed
and configured over Oracle VM Virtualbox environment using the above software. Including Network and Shared Storage Provisioning.
Now we will see how we can configure the Oracle 19c two nodes RAC setup.
sed -i 's/SELINUX=enforcing/SELINUX=disabled/g' /etc/selinux/config
systemctl stop firewalld
systemctl disable firewalld
systemctl stop chronyd.service
systemctl disable chronyd.service
mv /etc/chrony.conf /etc/chrony.conf.bak
groupadd -g 54331 oinstall
groupadd -g 54332 dba
groupadd -g 54333 oper
groupadd -g 54334 backupdba
groupadd -g 54335 dgdba
groupadd -g 54336 kmdba
groupadd -g 54337 asmdba
groupadd -g 54338 asmoper
groupadd -g 54339 asmadmin
groupadd -g 54340 racdba
useradd -m -u 54332 -g oinstall -G dba,asmadmin,asmdba,asmoper -d /home/grid -s /bin/bash grid
echo "grid" | passwd --stdin grid
useradd -m -u 54331 -g oinstall -G dba,oper,backupdba,dgdba,kmdba,asmdba,asmadmin,racdba -d /home/oracle -s /bin/bash oracle
echo "oracle" | passwd --stdin oracle
mkdir -p /u01/app/grid
mkdir -p /u01/app/19.2/grid
mkdir -p /u02/app/oracle
mkdir -p /u02/app/oracle/product/19.2
chmod -R 775 /u01
chmod -R 775 /u02
chown -R grid:oinstall /u01
chown -R oracle:oinstall /u02/app/oracle
export ORACLE_BASE=/u01/app/grid
export ORACLE_HOME=/u01/app/19.2/grid
export PATH=$ORACLE_HOME/bin:$ORACLE_HOME/OPatch:$PATH
umask 22
export ORACLE_BASE=/u02/app/oracle
export ORACLE_HOME=$ORACLE_BASE/product/19.2
export PATH=$ORACLE_HOME/bin:$ORACLE_HOME/OPatch:$PATH
umask 22
export PATH=$ORACLE_HOME/bin:$ORACLE_HOME/OPatch:$PATH
yum install -y oracle-database-preinstall-18c.x86_64
yum install kmod-oracleasm
yum install oracleasm-support oracleasmlib oracleasm-`uname -r`
oracleasm configure -i
192.168.56.115 sspdb01.localdomain sspdb01
192.168.56.116 sspdb02.localdomain sspdb02
#Vip
192.168.56.118 sspdb01-vip.localdomain sspdb01-vip
192.168.56.119 sspdb02-vip.localdomain sspdb02-vip
#private ip
10.10.10.21 sspdb01-priv.localdomain sspdb01-priv
10.10.10.22 sspdb02-priv.localdomain sspdb02-priv
#SCAN ip
192.168.56.120 sspdb-cluster sspdb-cluster-scan
Make sure the public and Private networks are reachable from both nodes.
The VIP network should not be reachable as of now. once the setup is done this virtual network will be enabled automatically.
Make sure the 3 Scan IPs are resolvable via nslookup utility; since its just a lab setup I used a single scan IP as mentioned in above '/etc/hosts' file.

Unlike the previous versions, you can see various types cluster setups available in 19c.
To know more about each type cluster configuration and it's purpose, please refer to Oracle Document grid-infrastructure-installation-and-upgrade 19c.
However, here is the generic installation so I will be choosing the default standalone cluster.

We can see a new SCAN option called Shared, for more information refer to grid-infrastructure-installation-and-upgrade 19c.
Selecting the default Local SCAN option here.

Add the 2nd node's details and setup SSH connectivity for Grid user.

self-explanatory

self-explanatory

self-explanatory

self-explanatory

Choose suitable interfaces as below.

As usual choose ASM Storage.

I chose the Grid Infrastructure Management Repository (GIMR) to be configured as this will be useful for debugging cluster related failures.

I will be using same Disk group for OCR/VD/GIMR here, though we have the option to different disk group for GIMR.

Below are the required OCR disk group capacity depending on the Redundancy which will also holds GIMR data.
External: around 30 GB
Normal: around 60 GB
High : around 90 GB.
I selected External Redundancy

self-explanatory

self-explanatory

self-explanatory

self-explanatory

self-explanatory

self-explanatory

We have the option to provide the root or equivalent sudo credentials in the below step. However I would like to see what exactly it does during the root scripts execution, the credentials are not passed.

self-explanatory

Run the 'Fix and Check Again' and also resolve the relevant warnings/Failed checks.

self-explanatory

self-explanatory

Once make sure we are good to proceed.

self-explanatory

self-explanatory


self-explanatory

Make sure all the Clusterware Nodes are selected and also setup the SSH connectivity for 'oracle' user as below.

self-explanatory

self-explanatory

self-explanatory

Choose the relevant groups, I have selected the default ones.

I will run the root scripts exclusively hence leaving the below one unchecked.

self-explanatory

self-explanatory

self-explanatory

Run the root.sh script on both nodes.

self-explanatory

Software Requirements.
1. Download Latest Oracle VM Virtual box for your suitable host OS from https://www.virtualbox.org/wiki/Downloads

2. Download Oracle Linux 6.7 (64-bit) from Oracle edelivery site. https://www.edelivery.oracle.com

3. Download Oracle 19c GRID and RDBMS software from oracle edelivery.

System Readiness:
It is assumed that the required 2 Database Servers are installed
and configured over Oracle VM Virtualbox environment using the above software. Including Network and Shared Storage Provisioning.
#################################################
Now we will see how we can configure the Oracle 19c two nodes RAC setup.
Execute the below commands to quickly set up the system prerequisites on both servers.
sed -i 's/SELINUX=enforcing/SELINUX=disabled/g' /etc/selinux/config
systemctl stop firewalld
systemctl disable firewalld
systemctl stop chronyd.service
systemctl disable chronyd.service
mv /etc/chrony.conf /etc/chrony.conf.bak
groupadd -g 54331 oinstall
groupadd -g 54332 dba
groupadd -g 54333 oper
groupadd -g 54334 backupdba
groupadd -g 54335 dgdba
groupadd -g 54336 kmdba
groupadd -g 54337 asmdba
groupadd -g 54338 asmoper
groupadd -g 54339 asmadmin
groupadd -g 54340 racdba
useradd -m -u 54332 -g oinstall -G dba,asmadmin,asmdba,asmoper -d /home/grid -s /bin/bash grid
echo "grid" | passwd --stdin grid
useradd -m -u 54331 -g oinstall -G dba,oper,backupdba,dgdba,kmdba,asmdba,asmadmin,racdba -d /home/oracle -s /bin/bash oracle
echo "oracle" | passwd --stdin oracle
mkdir -p /u01/app/grid
mkdir -p /u01/app/19.2/grid
mkdir -p /u02/app/oracle
mkdir -p /u02/app/oracle/product/19.2
chmod -R 775 /u01
chmod -R 775 /u02
chown -R grid:oinstall /u01
chown -R oracle:oinstall /u02/app/oracle
Update the bash profile file for grid, oracle and root users respectively as below.
In grid's bash profile:
export ORACLE_SID=+ASM1export ORACLE_BASE=/u01/app/grid
export ORACLE_HOME=/u01/app/19.2/grid
export PATH=$ORACLE_HOME/bin:$ORACLE_HOME/OPatch:$PATH
umask 22
In oracle's bash profile:
export ORACLE_SID=orclexport ORACLE_BASE=/u02/app/oracle
export ORACLE_HOME=$ORACLE_BASE/product/19.2
export PATH=$ORACLE_HOME/bin:$ORACLE_HOME/OPatch:$PATH
umask 22
In root's bash profile:
export ORACLE_HOME=/u01/app/19.2/gridexport PATH=$ORACLE_HOME/bin:$ORACLE_HOME/OPatch:$PATH
Install the required RPMs as below:
yum install -y oracle-database-preinstall-18c.x86_64
yum install kmod-oracleasm
yum install oracleasm-support oracleasmlib oracleasm-`uname -r`
Configure oracleasm utility.
oracleasm configure -i
Update the '/etc/hosts' file with suitable IP Addresses and Hostnames.
#public ip192.168.56.115 sspdb01.localdomain sspdb01
192.168.56.116 sspdb02.localdomain sspdb02
#Vip
192.168.56.118 sspdb01-vip.localdomain sspdb01-vip
192.168.56.119 sspdb02-vip.localdomain sspdb02-vip
#private ip
10.10.10.21 sspdb01-priv.localdomain sspdb01-priv
10.10.10.22 sspdb02-priv.localdomain sspdb02-priv
#SCAN ip
192.168.56.120 sspdb-cluster sspdb-cluster-scan
Make sure the public and Private networks are reachable from both nodes.
The VIP network should not be reachable as of now. once the setup is done this virtual network will be enabled automatically.
Make sure the 3 Scan IPs are resolvable via nslookup utility; since its just a lab setup I used a single scan IP as mentioned in above '/etc/hosts' file.
Cluster (Grid) Software Setup:
In 19c, the Grid Clusterware setup is slightly differed with previous traditional installations. Here we have to Unzip the grid software to Grid's ORACLE_HOME directly and run the gridSetup.sh script.
as root:
cd /media/sf_Software/19c/
unzip -q V981627-01.zip -d /u01/app/19.2/grid
chown -R grid:oinstall /u01
As grid user:
cd /u01/app/19.2/grid/
./gridSetup.sh

Unlike the previous versions, you can see various types cluster setups available in 19c.
To know more about each type cluster configuration and it's purpose, please refer to Oracle Document grid-infrastructure-installation-and-upgrade 19c.
However, here is the generic installation so I will be choosing the default standalone cluster.

We can see a new SCAN option called Shared, for more information refer to grid-infrastructure-installation-and-upgrade 19c.
Selecting the default Local SCAN option here.

Add the 2nd node's details and setup SSH connectivity for Grid user.

self-explanatory

self-explanatory

self-explanatory

self-explanatory

Choose suitable interfaces as below.

As usual choose ASM Storage.

I chose the Grid Infrastructure Management Repository (GIMR) to be configured as this will be useful for debugging cluster related failures.

I will be using same Disk group for OCR/VD/GIMR here, though we have the option to different disk group for GIMR.

Below are the required OCR disk group capacity depending on the Redundancy which will also holds GIMR data.
External: around 30 GB
Normal: around 60 GB
High : around 90 GB.

self-explanatory

self-explanatory

self-explanatory

self-explanatory

self-explanatory

self-explanatory

We have the option to provide the root or equivalent sudo credentials in the below step. However I would like to see what exactly it does during the root scripts execution, the credentials are not passed.

self-explanatory

Run the 'Fix and Check Again' and also resolve the relevant warnings/Failed checks.

self-explanatory

self-explanatory


self-explanatory

self-explanatory

You can observe the changes in root.sh output as compared to previous installations.
1st Node:
[root@sspdb01 rpm]# /u01/app/oraInventory/orainstRoot.sh
Changing permissions of /u01/app/oraInventory.
Adding read,write permissions for group.
Removing read,write,execute permissions for world.
Changing groupname of /u01/app/oraInventory to oinstall.
The execution of the script is complete.
[root@sspdb01 rpm]# /u01/app/19.2/grid/root.sh
Performing root user operation.
The following environment variables are set as:
ORACLE_OWNER= grid
ORACLE_HOME= /u01/app/19.2/grid
Enter the full pathname of the local bin directory: [/usr/local/bin]:
Copying dbhome to /usr/local/bin ...
Copying oraenv to /usr/local/bin ...
Copying coraenv to /usr/local/bin ...
Creating /etc/oratab file...
Entries will be added to the /etc/oratab file as needed by
Database Configuration Assistant when a database is created
Finished running generic part of root script.
Now product-specific root actions will be performed.
Relinking oracle with rac_on option
Using configuration parameter file: /u01/app/19.2/grid/crs/install/crsconfig_params
The log of current session can be found at:
/u01/app/grid/crsdata/sspdb01/crsconfig/rootcrs_sspdb01_2019-02-23_00-25-26AM.log
2019/02/23 00:26:07 CLSRSC-594: Executing installation step 1 of 19: 'SetupTFA'.
2019/02/23 00:26:08 CLSRSC-594: Executing installation step 2 of 19: 'ValidateEnv'.
2019/02/23 00:26:08 CLSRSC-363: User ignored prerequisites during installation
2019/02/23 00:26:08 CLSRSC-594: Executing installation step 3 of 19: 'CheckFirstNode'.
2019/02/23 00:26:17 CLSRSC-594: Executing installation step 4 of 19: 'GenSiteGUIDs'.
2019/02/23 00:26:20 CLSRSC-594: Executing installation step 5 of 19: 'SetupOSD'.
2019/02/23 00:26:20 CLSRSC-594: Executing installation step 6 of 19: 'CheckCRSConfig'.
2019/02/23 00:26:23 CLSRSC-594: Executing installation step 7 of 19: 'SetupLocalGPNP'.
2019/02/23 00:29:25 CLSRSC-594: Executing installation step 8 of 19: 'CreateRootCert'.
2019/02/23 00:30:00 CLSRSC-4002: Successfully installed Oracle Trace File Analyzer (TFA) Collector.
2019/02/23 00:30:01 CLSRSC-594: Executing installation step 9 of 19: 'ConfigOLR'.
2019/02/23 00:30:39 CLSRSC-594: Executing installation step 10 of 19: 'ConfigCHMOS'.
2019/02/23 00:30:40 CLSRSC-594: Executing installation step 11 of 19: 'CreateOHASD'.
2019/02/23 00:31:06 CLSRSC-594: Executing installation step 12 of 19: 'ConfigOHASD'.
2019/02/23 00:31:07 CLSRSC-330: Adding Clusterware entries to file 'oracle-ohasd.service'
2019/02/23 00:32:06 CLSRSC-594: Executing installation step 13 of 19: 'InstallAFD'.
2019/02/23 00:32:32 CLSRSC-594: Executing installation step 14 of 19: 'InstallACFS'.
2019/02/23 00:32:53 CLSRSC-594: Executing installation step 15 of 19: 'InstallKA'.
2019/02/23 00:33:11 CLSRSC-594: Executing installation step 16 of 19: 'InitConfig'.
ASM has been created and started successfully.
[DBT-30001] Disk groups created successfully. Check /u01/app/grid/cfgtoollogs/asmca/asmca-190223AM123423.log for details.
2019/02/23 00:36:42 CLSRSC-482: Running command: '/u01/app/19.2/grid/bin/ocrconfig -upgrade grid oinstall'
CRS-4256: Updating the profile
Successful addition of voting disk bec6dfe80d344f21bf747466dd2342aa.
Successfully replaced voting disk group with +OCR.
CRS-4256: Updating the profile
CRS-4266: Voting file(s) successfully replaced
## STATE File Universal Id File Name Disk group
-- ----- ----------------- --------- ---------
1. ONLINE bec6dfe80d344f21bf747466dd2342aa (/dev/oracleasm/disks/OCR05) [OCR]
Located 1 voting disk(s).
2019/02/23 00:42:07 CLSRSC-594: Executing installation step 17 of 19: 'StartCluster'.
2019/02/23 00:44:59 CLSRSC-343: Successfully started Oracle Clusterware stack
2019/02/23 00:44:59 CLSRSC-594: Executing installation step 18 of 19: 'ConfigNode'.
2019/02/23 00:53:03 CLSRSC-594: Executing installation step 19 of 19: 'PostConfig'.
2019/02/23 01:00:02 CLSRSC-325: Configure Oracle Grid Infrastructure for a Cluster ... succeeded
2nd Node:
[root@sspdb02 ~]# /u01/app/19.2/grid/root.sh
Performing root user operation.
The following environment variables are set as:
ORACLE_OWNER= grid
ORACLE_HOME= /u01/app/19.2/grid
Enter the full pathname of the local bin directory: [/usr/local/bin]:
Copying dbhome to /usr/local/bin ...
Copying oraenv to /usr/local/bin ...
Copying coraenv to /usr/local/bin ...
Creating /etc/oratab file...
Entries will be added to the /etc/oratab file as needed by
Database Configuration Assistant when a database is created
Finished running generic part of root script.
Now product-specific root actions will be performed.
Relinking oracle with rac_on option
Using configuration parameter file: /u01/app/19.2/grid/crs/install/crsconfig_params
The log of current session can be found at:
/u01/app/grid/crsdata/sspdb02/crsconfig/rootcrs_sspdb02_2019-02-23_01-04-55AM.log
2019/02/23 01:05:38 CLSRSC-594: Executing installation step 1 of 19: 'SetupTFA'.
2019/02/23 01:05:39 CLSRSC-594: Executing installation step 2 of 19: 'ValidateEnv'.
2019/02/23 01:05:39 CLSRSC-363: User ignored prerequisites during installation
2019/02/23 01:05:39 CLSRSC-594: Executing installation step 3 of 19: 'CheckFirstNode'.
2019/02/23 01:05:45 CLSRSC-594: Executing installation step 4 of 19: 'GenSiteGUIDs'.
2019/02/23 01:05:45 CLSRSC-594: Executing installation step 5 of 19: 'SetupOSD'.
2019/02/23 01:05:45 CLSRSC-594: Executing installation step 6 of 19: 'CheckCRSConfig'.
2019/02/23 01:05:50 CLSRSC-594: Executing installation step 7 of 19: 'SetupLocalGPNP'.
2019/02/23 01:05:55 CLSRSC-594: Executing installation step 8 of 19: 'CreateRootCert'.
2019/02/23 01:05:55 CLSRSC-594: Executing installation step 9 of 19: 'ConfigOLR'.
2019/02/23 01:06:10 CLSRSC-594: Executing installation step 10 of 19: 'ConfigCHMOS'.
2019/02/23 01:06:11 CLSRSC-594: Executing installation step 11 of 19: 'CreateOHASD'.
2019/02/23 01:06:17 CLSRSC-594: Executing installation step 12 of 19: 'ConfigOHASD'.
2019/02/23 01:06:18 CLSRSC-330: Adding Clusterware entries to file 'oracle-ohasd.service'
2019/02/23 01:07:47 CLSRSC-594: Executing installation step 13 of 19: 'InstallAFD'.
2019/02/23 01:08:12 CLSRSC-594: Executing installation step 14 of 19: 'InstallACFS'.
2019/02/23 01:08:40 CLSRSC-594: Executing installation step 15 of 19: 'InstallKA'.
2019/02/23 01:08:58 CLSRSC-594: Executing installation step 16 of 19: 'InitConfig'.
2019/02/23 01:09:13 CLSRSC-4002: Successfully installed Oracle Trace File Analyzer (TFA) Collector.
2019/02/23 01:09:53 CLSRSC-594: Executing installation step 17 of 19: 'StartCluster'.
2019/02/23 01:11:46 CLSRSC-343: Successfully started Oracle Clusterware stack
2019/02/23 01:11:47 CLSRSC-594: Executing installation step 18 of 19: 'ConfigNode'.
2019/02/23 01:14:42 CLSRSC-594: Executing installation step 19 of 19: 'PostConfig'.
2019/02/23 01:15:35 CLSRSC-325: Configure Oracle Grid Infrastructure for a Cluster ... succeeded
Post of Cluster Setup:
[root@sspdb02 bin]# ./crsctl check cluster -all
**************************************************************
sspdb01:
CRS-4537: Cluster Ready Services is online
CRS-4529: Cluster Synchronization Services is online
CRS-4533: Event Manager is online
**************************************************************
sspdb02:
CRS-4537: Cluster Ready Services is online
CRS-4529: Cluster Synchronization Services is online
CRS-4533: Event Manager is online
**************************************************************
[root@sspdb02 bin]# ./crsctl stat res -t
--------------------------------------------------------------------------------
Name Target State Server State details
--------------------------------------------------------------------------------
Local Resources
--------------------------------------------------------------------------------
ora.LISTENER.lsnr
ONLINE ONLINE sspdb01 STABLE
ONLINE ONLINE sspdb02 STABLE
ora.chad
ONLINE ONLINE sspdb01 STABLE
ONLINE ONLINE sspdb02 STABLE
ora.net1.network
ONLINE ONLINE sspdb01 STABLE
ONLINE ONLINE sspdb02 STABLE
ora.ons
ONLINE ONLINE sspdb01 STABLE
ONLINE ONLINE sspdb02 STABLE
--------------------------------------------------------------------------------
Cluster Resources
--------------------------------------------------------------------------------
ora.ASMNET1LSNR_ASM.lsnr(ora.asmgroup)
1 ONLINE ONLINE sspdb01 STABLE
2 ONLINE ONLINE sspdb02 STABLE
3 ONLINE OFFLINE STABLE
ora.LISTENER_SCAN1.lsnr
1 ONLINE ONLINE sspdb02 STABLE
ora.MGMTLSNR
1 OFFLINE OFFLINE STABLE
ora.OCR.dg(ora.asmgroup)
1 ONLINE ONLINE sspdb01 STABLE
2 ONLINE ONLINE sspdb02 STABLE
3 OFFLINE OFFLINE STABLE
ora.asm(ora.asmgroup)
1 ONLINE ONLINE sspdb01 Started,STABLE
2 ONLINE ONLINE sspdb02 Started,STABLE
3 OFFLINE OFFLINE STABLE
ora.asmnet1.asmnetwork(ora.asmgroup)
1 ONLINE ONLINE sspdb01 STABLE
2 ONLINE ONLINE sspdb02 STABLE
3 OFFLINE OFFLINE STABLE
ora.cvu
1 ONLINE ONLINE sspdb02 STABLE
ora.mgmtdb
1 OFFLINE OFFLINE STABLE
ora.qosmserver
1 ONLINE ONLINE sspdb02 STABLE
ora.scan1.vip
1 ONLINE ONLINE sspdb02 STABLE
ora.sspdb01.vip
1 ONLINE ONLINE sspdb01 STABLE
ora.sspdb02.vip
1 ONLINE ONLINE sspdb02 STABLE
--------------------------------------------------------------------------------
The above mentioned OFFLINE services are needed to be exclusively added to make it ONLINE, Refer to grid-infrastructure-installation-and-upgrade 19c.
At this point, the GRID Setup is successfully completed.
Oracle Software installation:
Unzip the Oracle database software to oracle's ORACLE_HOME directly and run the runInstaller.sh script.
as root:
cd /media/sf_Software/19c/
unzip -q V981623-01.zip -d /u02/app/oracle/product/19.2
chown -R oracle:oinstall /u02
As oracle user:
cd /u02/app/oracle/product/19.2
start the installation now.
./runInstaller.sh

self-explanatory

Make sure all the Clusterware Nodes are selected and also setup the SSH connectivity for 'oracle' user as below.

self-explanatory

self-explanatory

self-explanatory

Choose the relevant groups, I have selected the default ones.

I will run the root scripts exclusively hence leaving the below one unchecked.

self-explanatory

self-explanatory
self-explanatory

Run the root.sh script on both nodes.
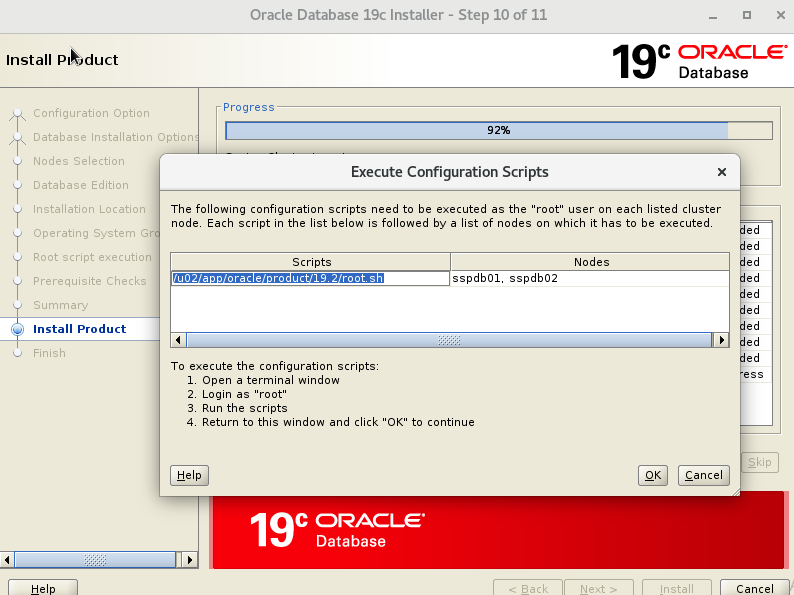
self-explanatory

The database software installation is successfully completed.
I hope you enjoyed reading this article.
Please let me know once you also install this setup.

